QR and Barcodes
For efficiency, you can use QR codes and barcodes to find the item or borrower in the system easier. Especially when you’re adding people or items to a lend-out, it will make the process way easier. That being said, if the borrowers have employed card, student card or customer card, and it has NFC technology, you could use your device’s NFC scanner to add them to a lend-out. That would be better than them carrying a QR or Barcode around to you each time they borrow something, or that you would have to print out a QR or Barcode when you add them for the first time.
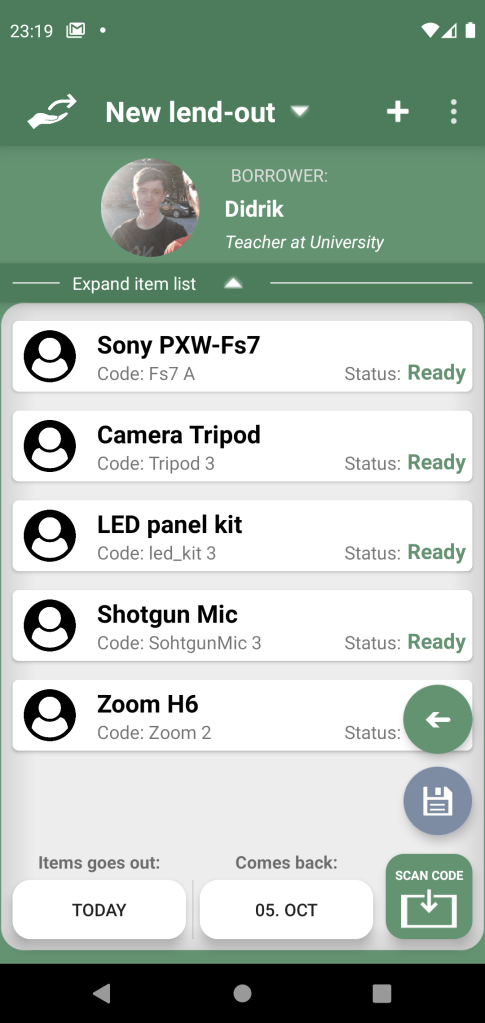
When you want to scan with the camera on lend-out, you’ll click the icon at the bottom right saying “Scan code”. Or, when you’re just viewing a list of borrowers or list of lend-outs, you can find the “Scan code” option in the dropdown menu for that page.
When you initialize the app and have populated it with items and borrowers, you need to dedicate some hours to plan, print and place the codes on the items. Things you need to think about is:
- Where to place the code.
- How to attach the code to the items.
- Whether to use barcode or QR code.
- Sizes of codes. How much space do you have on the code?
Placement of the code is important for efficiency. If you’re lending out 20 things, you don’t want to constantly be looking for the code because it is at random places, hidden in a pocket or at the back side. During lend-out i recommend to find all the stuff for the lend-out first (perhaps you have a list of things they want to borrow) and line them up so all the codes are visible. Then, you find your device and app and scan all of them. Switching between finding stuff and scanning them can take more time, and even give a higher chance for accidentally drop the device and potentially crack the screen.
How you attach the code to the item is also a good thing to plan ahead. You may want to buy different materials dependent on how you do it.
When you have figured out where to place the code, and how you attach it, you can decide whether to use QR or Barcode. There are multiple reasons to choose one over the other, here are some of them:
- QR codes are known to be links to websites
- Barcodes can only be scanned horizontally. QR codes can be scanned from all directions
- Barcodes have small lines packed together, since it is one dimensional. Therefore QR codes can either have more information in it, or it can be much smaller than barcode.
- Barcode is best in a 2:1 ratio, while QR code is 1:1 ratio. (In terms of vertical and horizontal size)
- With a subscription you can use the QR code as a link to a webpage with information about the item, as well as scannable for the app during lend-out. Neat!
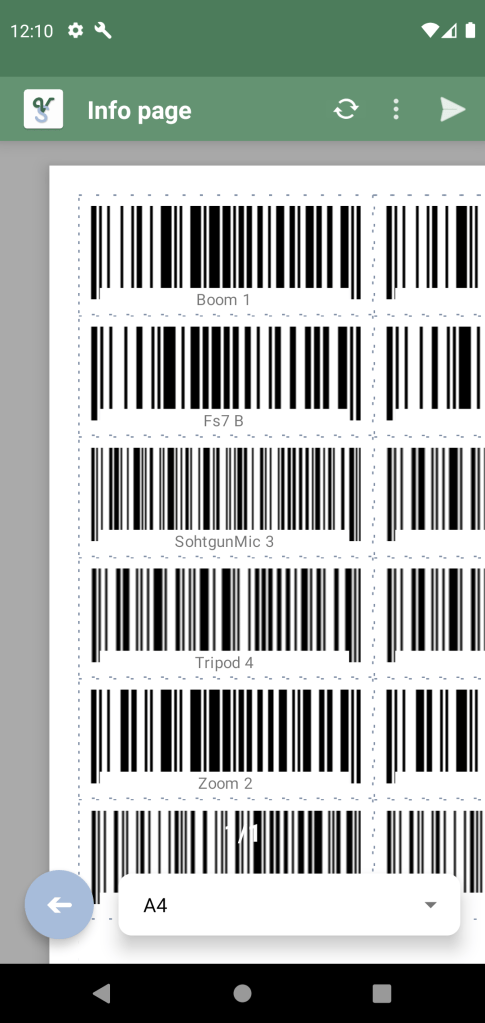
Keep in mind, if you want to include text like the name or code of the item, the QR code layout would be a little larger vertically to make space for that. With barcode, the text can be overlayed like in the image shown to the left.
Then there is the sizes of the codes. There is a limit to how small you can make things and how much information there can be in a barcode and QR before the phone camera is unable to read it. The general rule is, keep the item code as short as possible on creation, so the QR and barcode can be as small as possible. The bigger the better for the phone and your efficiency – the easier it is to read for your phone, the faster it will scan the code.
Print QR or Barcodes
Now you may be thinking, where and how can I make and print all these codes? My lend-out system has hundreds of things. Don’t worry, we got you! The VolunShare app has its own page just for printing out QR and barcodes to your desired sizes. Just plot in the information and paper size, and let the app do the rest. You can then print the populated papers straight from the app!
Simply go to the System list, choose what items or borrowers you want to export. You’ll find the “Select Multiple” button in the dropdown menu in the top right, and in “Select opts..” -> “Export as..” -> then choose “QR document” or “Barcode document”. Doesn’t really matter which since you can change each individually to either QR or Barcode later, but you can choose the one you want to use the most. You can then also edit each individual sizes, whether you want text, if you want scissor lines, etc.
Underneath is information on how to use our print QR and Barcode page.
PRINT QR OR BARCODES PAGE
How to use
Upon going to this page, it will automatically start populating the paper page with the codes you chose. If you have chosen a lot of codes and don’t want to wait for it to finish populating the paper, you can just “Cancel” at the top menu.
Edit paper size/type
First of all, you can select the type of a paper at the bottom. Supported paper types are:
A3, A4 A5, US Letter, US Legal, US Tabloid, and square.
If you want us to add another type, please tell us! Hopefully the ones we added covers most cases.
Reload / re-populate
Next, if you at any point want to re-populate the paper, press the update button at the top menu.
Dropdown menu
In the dropdown menu, you’ll find a lot of options.
You can toggle on or of Scissor Lines – these are dots that show you where you should cut, to make sure you cut perfect lines. You can choose to include text such as the name or the code that belongs to the Barcode or QR code – this way you’ll know which one is which. You can also toggle between the Metric system or Imperial system by pressing Measurement.
Sometimes the app may calculate all of these numbers wrongly, which will make the barcodes and QR codes bug out a little. You’ll see when this happens when the papers are done loading, but the paper does not show any codes, and probably even no scissor lines. Or, it has only been able to load one row per paper. You can easily fix this by changing the row or column offsets, also found in the drop down menu. If you see codes only as a row on the top, you should offset the row by -1. Try again by pressing the reload button, and see if that fixed it. If not, try again by offsetting by another -1. If on the other hand you only see one code on the left side of the paper, it is probably the columns that must be offset.
Zoom into paper
Need to look closer at something on the paper? We added zoom in functionality so you can do that. Also, if you have multiple papers loaded, you can navigate through them with the arrows underneath the papers.
Print preferences
In the dropdown meny you will also find “Print Preferences”. Here you can have a lot of options for the paper and for each individual code, so you can get exactly what you need. More info about this further down.
Export button
When you are done editing the paper, you can send it to a printer, save it as a file, or sent it to someone by pressing the arrow at the top menu.

Print preferences
Print preferences gives you multiple options to make each code exactly what you need.
First of all, you can collapse the Paper Settings or Code Settings to expand the code list, so it is easier to view each individual code.
Paper settings
In the top, you can simply switch to Imperial if needed. You can also add more margins if you want, and margins to all the codes if you want or need some extra white space. Remember that both QR or Barcode, need at least a tiny white border around it, or they will not be scannable.
Code settings
In code settings you have some reset options for all the codes. Good to know now, before you loose changes you’ve done, since these are not reversible. You will get a warning before anything gets reset, so don’t worry to mis-click anything.
All the codes in the list are grouped. This means that any changes to a list element will change all the codes of that type. Say you have 5 canon cameras, the code of all those 5 are grouped to one. This will make it simpler and faster since you most likely want the same type of code to scan for the same type of item. If not, no worries you can press “Ungroup Codes” underneath the dialogue to ungroup all codes. Just make sure to do the grouped edits first and then each individual edits at the end, since you cannot go back to grouped codes without resetting the changes done to each individual ones.
When it comes to the list, you will have the option to choose which one is Barcode and which one is QR. You can also edit the width or height by pressing the pencil.
